В этом руководстве вы выполните шаги, необходимые для создания сверточной нейронной сети (CNN / ConvNet) с использованием TensorFlow и внедрения ее в производство, разрешив удаленный доступ через приложение на основе HTTP с помощью Flask RESTful API.
Этот учебник занимает второе место среди самых популярных публикаций на KDnuggets.com в период с 15 по 20 мая 2018 года. Он получил серебряный значок.
В этом руководстве CNN будет построена с использованием модуля TensorFlow NN (tf.nn). Архитектура модели CNN создана, обучена и протестирована с набором данных CIFAR10. Чтобы сделать модель удаленно доступной, с помощью Python создается веб-приложение Flask, которое принимает загруженное изображение и возвращает его классификационную метку с помощью HTTP. Anaconda3 используется в дополнение к TensorFlow в Windows с поддержкой ЦП. В этом руководстве предполагается, что вы имеете базовое представление о CNN, например о слоях, шагах и отступах. Также требуются знания о Python.
Учебное пособие состоит из следующих этапов:
1. Подготовка среды путем установки Python, TensorFlow, PyCharm и Flask API.
2. Загрузка и подготовка набора данных CIFAR-10.
3. Построение вычислительного графа CNN с использованием TensorFlow.
4. Обучение CNN.
5. Сохранение обученной модели CNN.
6. Подготовка тестовых данных и восстановление обученной модели CNN.
7. Тестирование обученной модели CNN.
8. Создание веб-приложения Flask.
9. Загрузите изображение с помощью HTML-формы.
10. Создание вспомогательных файлов HTML, JavaScript и CSS.
11. Удаленный доступ на основе HTTP к обученной модели для прогнозирования.
1. Установка Python, TensorFlow, PyCharm и Flask API
Перед тем, как приступить к созданию проекта, необходимо подготовить его окружение. Python - это первый инструмент, который нужно установить, потому что среда полностью от него зависит. Если у вас уже есть подготовленная среда, вы можете пропустить первый шаг.
1.1 Установка Anaconda / Python
Можно установить собственный дистрибутив Python, но рекомендуется использовать универсальный пакет, такой как Anaconda, потому что он кое-что делает за вас. В этом проекте используется Anaconda 3. Для Windows исполняемый файл можно скачать с https://www.anaconda.com/download/#windows. Его легко установить.
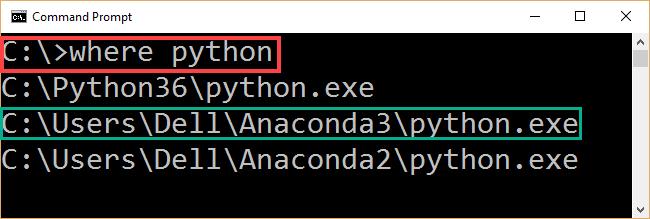
Чтобы обеспечить правильную установку Anaconda3, можно ввести команду CMD (где python), как показано на рисунке 1. Если Anaconda3 установлен правильно, путь его установки появится в выходных данных команды.
1.2 Установка TensorFlow
После установки Python с использованием Anaconda3 следует установить TensorFlow (TF). В этом руководстве используется TF в Windows с поддержкой ЦП. Инструкции по установке находятся на этой странице https://www.tensorflow.org/install/install_windows. Это видео на YouTube может оказаться полезным (https://youtu.be/MsONo20MRVU).
Шаги установки TF следующие:
1) Создание среды conda для TF с помощью этой команды:
C:> conda create -n tensorflow pip python=3.5
Это создает пустую папку, содержащую виртуальную среду (venv) для установки TF. Venv находится в каталоге установки Anaconda3 в этом месте (\ Anaconda3 \ envs \ tensorflow).
2) Активация venv для установки TensorFlow с помощью этой команды:
C:> activate tensorflow
Приведенная выше команда сообщает, что мы находимся внутри venv и любая установка библиотеки будет внутри него. Ожидается, что после этой команды командная строка будет изменена на (tenorflow) C: ›. Попав в каталог, мы готовы к установке библиотеки.
3) После активации venv версия Windows TensorFlow только для ЦП может быть установлена с помощью следующей команды:
(tensorflow)C:> pip install --ignore-installed --upgrade tensorflow
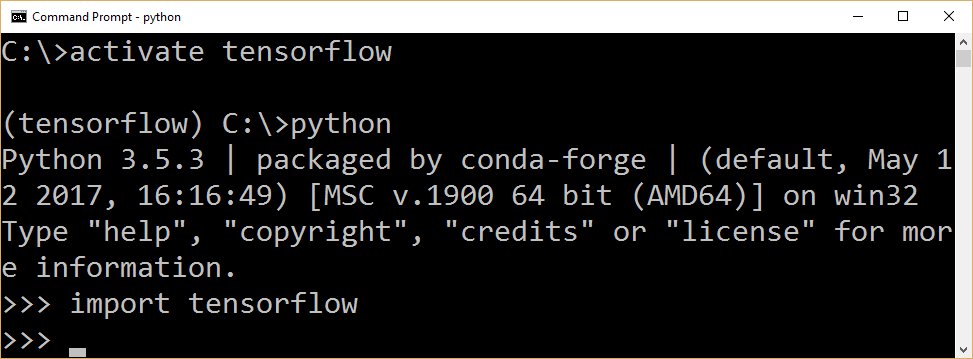
Чтобы проверить, правильно ли установлен TF, мы можем попробовать импортировать его, как показано на рисунке 2. Но помните, что перед импортом TF необходимо активировать его venv. При тестировании из CMD нам нужно выполнить команду python, чтобы иметь возможность взаимодействовать с Python. Поскольку в строке импорта не было ошибок, TF успешно установлен.
1.3 Установка PyCharm Python IDE
Для этого проекта рекомендуется использовать Python IDE, а не вводить команды в CMD. IDE, используемая в этом руководстве, - PyCharm. Его исполняемый файл для Windows можно скачать с этой страницы https://www.jetbrains.com/pycharm/download/#section=windows. Инструкции по установке довольно просты.
После загрузки и установки PyCharm Python IDE необходимо связать его с TF. Это делается путем установки его интерпретатора Python на установленный Python под TF venv, как показано на рисунке 3. Для этого нужно открыть настройки IDE и выбрать интерпретатор проекта для установленного файла python.exe. внутри TF venv.

1.4 Установка Flask
Последний инструмент, который нужно установить, - это Flask RESTful API. Это библиотека, которую нужно установить с помощью установщика pip / conda под TF venv, используя следующую команду CMD:
C:> pip install Flask-API
Если они еще не установлены, NumPy и SciPy должны быть установлены внутри venv, чтобы иметь возможность читать изображения и управлять ими.
Установив Anaconda (Python), TensorFlow, PyCharm и Flask, мы готовы начать сборку проекта.
2. Загрузка и подготовка набора данных CIFAR-10
Версия Python набора данных CIFAR из 10 классов (CIFAR-10) может быть загружена с этой страницы https://www.cs.toronto.edu/~kriz/cifar.html. Набор данных содержит 60 000 изображений, разделенных на данные для обучения и тестирования. Есть пять файлов, содержащих данные обучения, каждый из которых содержит 10 000 изображений. Изображения в формате RGB размером 32x32x3. Учебные файлы называются data_batch_1, data_batch_2 и т. Д. Есть единственный файл с тестовыми данными test_batch с 10 000 изображений. Доступен файл метаданных с именем batches.meta, содержащий ярлыки классов набора данных: самолет, автомобиль, птица. , кошка, олень, собака, лягушка, лошадь, корабль и грузовик.
Поскольку каждый файл в наборе данных является двоичным файлом, его следует декодировать, чтобы получить фактические данные изображения. По этой причине создается функция unpickle_patch для выполнения такой работы, определенной следующим образом:
def unpickle_patch(file):
"""
Decoding the binary file.
:param file:File to decode it data.
:return: Dictionary of the file holding details including input data and output labels.
"""
patch_bin_file = open(file, 'rb')#Reading the binary file.
patch_dict = pickle.load(patch_bin_file, encoding='bytes')#Loading the details of the binary file into a dictionary.
return patch_dict#Returning the dictionary.
Метод принимает имя двоичного файла и возвращает словарь, содержащий сведения о таком файле. Словарь содержит данные для всех 10 000 образцов в файле в дополнение к их меткам.
Чтобы декодировать все данные обучения, создается новая функция get_dataset_images. Эта функция принимает путь к набору данных и работает только с обучающими данными. В результате он фильтрует файлы по этому пути и возвращает только файлы, начинающиеся с data_batch_. Данные тестирования готовятся позже, после построения и обучения CNN.
Для каждого обучающего файла он декодируется путем вызова функции unpickle_patch. На основе словаря, возвращаемого такой функцией, функция get_dataset_images возвращает как данные изображений, так и их метки классов. Данные изображений извлекаются из ключа ‘data’, а ярлыки их классов - из ключа ‘labels’.
Поскольку данные изображений сохраняются в виде 1D-вектора, их необходимо изменить, чтобы они были трехмерными. Это потому, что TensorFlow принимает изображения такой формы. По этой причине функция get_dataset_images принимает количество строк / столбцов в дополнение к количеству каналов в каждом изображении в качестве аргументов.
Реализация такой функции выглядит следующим образом:
def get_dataset_images(dataset_path, im_dim=32, num_channels=3):
    """
    This function accepts the dataset path, reads the data, and returns it after being reshaped to match the requierments of the CNN.
    :param dataset_path:Path of the CIFAR10 dataset binary files.
    :param im_dim:Number of rows and columns in each image. The image is expected to be rectangular.
    :param num_channels:Number of color channels in the image.
    :return:Returns the input data after being reshaped and output labels.
    """
    num_files = 5#Number of training binary files in the CIFAR10 dataset.
    images_per_file = 10000#Number of samples withing each binary file.
    files_names = os.listdir(patches_dir)#Listing the binary files in the dataset path.
    """
    Creating an empty array to hold the entire training data after being reshaped.
    The dataset has 5 binary files holding the data. Each binary file has 10,000 samples. Total number of samples in the dataset is 5*10,000=50,000.
    Each sample has a total of 3,072 pixels. These pixels are reshaped to form a RGB image of shape 32x32x3.
    Finally, the entire dataset has 50,000 samples and each sample of shape 32x32x3 (50,000x32x32x3).
    """
    dataset_array = numpy.zeros(shape=(num_files * images_per_file, im_dim, im_dim, num_channels))
    #Creating an empty array to hold the labels of each input sample. Its size is 50,000 to hold the label of each sample in the dataset.
    dataset_labels = numpy.zeros(shape=(num_files * images_per_file), dtype=numpy.uint8)
    index = 0#Index variable to count number of training binary files being processed.
    for file_name in files_names:
        """
        Because the CIFAR10 directory does not only contain the desired training files and has some  other files, it is required to filter the required files.
        Training files start by 'data_batch_' which is used to test whether the file is for training or not.
        """
        if file_name[0:len(file_name) - 1] == "data_batch_":
            print("Working on : ", file_name)
            """
            Appending the path of the binary files to the name of the current file.
            Then the complete path of the binary file is used to decoded the file and return the actual pixels values.
            """
            data_dict = unpickle_patch(dataset_path+file_name)
            """
            Returning the data using its key 'data' in the dictionary.
            Character b is used before the key to tell it is binary string.
            """
            images_data = data_dict[b"data"]
            #Reshaping all samples in the current binary file to be of 32x32x3 shape.
            images_data_reshaped = numpy.reshape(images_data, newshape=(len(images_data), im_dim, im_dim, num_channels))
            #Appending the data of the current file after being reshaped.
            dataset_array[index * images_per_file:(index + 1) * images_per_file, :, :, :] = images_data_reshaped
            #Appening the labels of the current file.
            dataset_labels[index * images_per_file:(index + 1) * images_per_file] = data_dict[b"labels"]
            index = index + 1#Incrementing the counter of the processed training files by 1 to accept new file.
    return dataset_array, dataset_labels#Returning the training input data and output labels.
Подготовив обучающие данные, мы можем построить и обучить модель CNN с помощью TF.
3. Построение вычислительного графа CNN с использованием TensorFlow
Вычислительный граф CNN создается внутри функции create_CNN. Он создает стек из слоев свертки (conv), ReLU, max pooling, dropout и full connected (FC) и возвращает результаты последнего полностью подключенного слоя. Выход каждого слоя является входом для следующего слоя. Это требует согласованности между размерами выходов и входов соседних слоев. Обратите внимание, что для каждого уровня объединения, ReLU и максимального количества пулов необходимо указать некоторые параметры, такие как шаги по каждому измерению и заполнение.
def create_CNN(input_data, num_classes, keep_prop):
"""
Builds the CNN architecture by stacking conv, relu, pool, dropout, and fully connected layers.
:param input_data:patch data to be processed.
:param num_classes:Number of classes in the dataset. It helps determining the number of outputs in the last fully connected layer.
:param keep_prop:probability of dropping neurons in the dropout layer.
:return: last fully connected layer.
"""
#Preparing the first convolution layer.
filters1, conv_layer1 = create_conv_layer(input_data=input_data, filter_size=5, num_filters=4)
"""
Applying ReLU activation function over the conv layer output.
It returns a new array of the same shape as the input array.
"""
relu_layer1 = tensorflow.nn.relu(conv_layer1)
print("Size of relu1 result : ", relu_layer1.shape)
"""
Max pooling is applied to the ReLU layer result to achieve translation invariance.
It returns a new array of a different shape from the the input array relative to the strides and kernel size used.
"""
max_pooling_layer1 = tensorflow.nn.max_pool(value=relu_layer1, ksize=[1, 2, 2, 1], strides=[1, 1, 1, 1], padding="VALID")
print("Size of maxpool1 result : ", max_pooling_layer1.shape)
#Similar to the previous conv-relu-pool layers, new layers are just stacked to complete the CNN architecture.
#Conv layer with 3 filters and each filter is of sisze of 5x5.
filters2, conv_layer2 = create_conv_layer(input_data=max_pooling_layer1, filter_size=7, num_filters=3)
relu_layer2 = tensorflow.nn.relu(conv_layer2)
print("Size of relu2 result : ", relu_layer2.shape)
max_pooling_layer2 = tensorflow.nn.max_pool(value=relu_layer2, ksize=[1, 2, 2, 1], strides=[1, 1, 1, 1], padding="VALID")
print("Size of maxpool2 result : ", max_pooling_layer2.shape)
#Conv layer with 2 filters and a filter sisze of 5x5.
filters3, conv_layer3 = create_conv_layer(input_data=max_pooling_layer2, filter_size=5, num_filters=2)
relu_layer3 = tensorflow.nn.relu(conv_layer3)
print("Size of relu3 result : ", relu_layer3.shape)
max_pooling_layer3 = tensorflow.nn.max_pool(value=relu_layer3, ksize=[1, 2, 2, 1], strides=[1, 1, 1, 1], padding="VALID")
print("Size of maxpool3 result : ", max_pooling_layer3.shape)
#Adding dropout layer before the fully connected layers to avoid overfitting.
flattened_layer = dropout_flatten_layer(previous_layer=max_pooling_layer3, keep_prop=keep_prop)
#First fully connected (FC) layer. It accepts the result of the dropout layer after being flattened (1D).
fc_resultl = fc_layer(flattened_layer=flattened_layer, num_inputs=flattened_layer.get_shape()[1:].num_elements(),
num_outputs=200)
#Second fully connected layer accepting the output of the previous fully connected layer. Number of outputs is equal to the number of dataset classes.
fc_result2 = fc_layer(flattened_layer=fc_resultl, num_inputs=fc_resultl.get_shape()[1:].num_elements(), num_outputs=num_classes)
print("Fully connected layer results : ", fc_result2)
return fc_result2#Returning the result of the last FC layer.
Поскольку слой свертки применяет операцию свертки между входными данными и набором используемых фильтров, функция create_CNN принимает входные данные в качестве входного аргумента. Именно такие данные возвращает функция get_dataset_images. Слой свертки создается с помощью функции create_conv_layer. Функция create_conv_layer принимает входные данные, размер фильтра и количество фильтров и возвращает результат свертки входных данных с набором фильтров. Набор фильтров имеет размер, установленный в соответствии с глубиной входных изображений. Create_conv_layer определяется следующим образом:
def create_conv_layer(input_data, filter_size, num_filters):
"""
Builds the CNN convolution (conv) layer.
:param input_data:patch data to be processed.
:param filter_size:#Number of rows and columns of each filter. It is expected to have a rectangular filter.
:param num_filters:Number of filters.
:return:The last fully connected layer of the network.
"""
"""
Preparing the filters of the conv layer by specifiying its shape.
Number of channels in both input image and each filter must match.
Because number of channels is specified in the shape of the input image as the last value, index of -1 works fine.
"""
filters = tensorflow.Variable(tensorflow.truncated_normal(shape=(filter_size, filter_size, tensorflow.cast(input_data.shape[-1], dtype=tensorflow.int32), num_filters),
stddev=0.05))
print("Size of conv filters bank : ", filters.shape)
"""
Building the convolution layer by specifying the input data, filters, strides along each of the 4 dimensions, and the padding.
Padding value of 'VALID' means the some borders of the input image will be lost in the result based on the filter size.
"""
conv_layer = tensorflow.nn.conv2d(input=input_data,
filter=filters,
strides=[1, 1, 1, 1],
padding="VALID")
print("Size of conv result : ", conv_layer.shape)
return filters, conv_layer#Returing the filters and the convolution layer result.
Другой аргумент - вероятность удержания нейронов в слое отсева. Он указывает, сколько нейронов отбрасывается отсекающим слоем. Слой исключения реализован с помощью функции dropout_flatten_layer, как показано ниже. Такая функция возвращает сплющенный массив, который будет входом в полностью связанный слой.
def dropout_flatten_layer(previous_layer, keep_prop):
"""
Applying the dropout layer.
:param previous_layer: Result of the previous layer to the dropout layer.
:param keep_prop: Probability of keeping neurons.
:return: flattened array.
"""
dropout = tensorflow.nn.dropout(x=previous_layer, keep_prob=keep_prop)
num_features = dropout.get_shape()[1:].num_elements()
layer = tensorflow.reshape(previous_layer, shape=(-1, num_features))#Flattening the results.
return layer
Поскольку последний слой FC должен иметь количество выходных нейронов, равное количеству классов набора данных, количество классов набора данных используется в качестве другого входного аргумента функции create_CNN. Полностью связанный слой создается с помощью функции fc_layer. Такая функция принимает сглаженный результат выпадающего слоя, количество функций в таком сглаженном результате и количество выходных нейронов из такого слоя FC. На основе количества входов и выходов создается тензор весов, который затем умножается на сплющенный слой, чтобы получить результат, возвращенный слоем FC.
def fc_layer(flattened_layer, num_inputs, num_outputs):
"""
uilds a fully connected (FC) layer.
:param flattened_layer: Previous layer after being flattened.
:param num_inputs: Number of inputs in the previous layer.
:param num_outputs: Number of outputs to be returned in such FC layer.
:return:
"""
#Preparing the set of weights for the FC layer. It depends on the number of inputs and number of outputs.
fc_weights = tensorflow.Variable(tensorflow.truncated_normal(shape=(num_inputs, num_outputs),
stddev=0.05))
#Matrix multiplication between the flattened array and the set of weights.
fc_resultl = tensorflow.matmul(flattened_layer, fc_weights)
return fc_resultl#Output of the FC layer (result of matrix multiplication).
Расчетный граф после визуализации с помощью TensorBoard показан на рисунке 4.

4. Обучение CNN
После построения вычислительного графа CNN следует обучить его на ранее подготовленных обучающих данных. Обучение проводится по следующему коду. Код начинается с подготовки пути к набору данных и подготовки его к заполнителю. Обратите внимание, что путь следует изменить, чтобы он соответствовал вашей системе. Затем он вызывает ранее обсужденные функции. Прогнозы обученной CNN используются для измерения стоимости сети, которая должна быть минимизирована с помощью оптимизатора градиентного спуска. Примечание: некоторые из тензоров имеют имя, которое полезно для получения таких тензоров позже при тестировании CNN.
#Nnumber of classes in the dataset. Used to specify number of outputs in the last fully connected layer.
num_datatset_classes = 10
#Number of rows & columns in each input image. The image is expected to be rectangular Used to reshape the images and specify the input tensor shape.
im_dim = 32
#Number of channels in rach input image. Used to reshape the images and specify the input tensor shape.
num_channels = 3
#Directory at which the training binary files of the CIFAR10 dataset are saved.
patches_dir = "C:\\Users\\Dell\\Downloads\\Compressed\\cifar-10-python\\cifar-10-batches-py\\"
#Reading the CIFAR10 training binary files and returning the input data and output labels. Output labels are used to test the CNN prediction accuracy.
dataset_array, dataset_labels = get_dataset_images(dataset_path=patches_dir, im_dim=im_dim, num_channels=num_channels)
print("Size of data : ", dataset_array.shape)
"""
Input tensor to hold the data read above. It is the entry point of the computational graph.
The given name of 'data_tensor' is useful for retreiving it when restoring the trained model graph for testing.
"""
data_tensor = tensorflow.placeholder(tensorflow.float32, shape=[None, im_dim, im_dim, num_channels], name='data_tensor')
"""
Tensor to hold the outputs label.
The name "label_tensor" is used for accessing the tensor when tesing the saved trained model after being restored.
"""
label_tensor = tensorflow.placeholder(tensorflow.float32, shape=[None], name='label_tensor')
#The probability of dropping neurons in the dropout layer. It is given a name for accessing it later.
keep_prop = tensorflow.Variable(initial_value=0.5, name="keep_prop")
#Building the CNN architecure and returning the last layer which is the fully connected layer.
fc_result2 = create_CNN(input_data=data_tensor, num_classes=num_datatset_classes, keep_prop=keep_prop)
"""
Predicitions probabilities of the CNN for each training sample.
Each sample has a probability for each of the 10 classes in the dataset.
Such tensor is given a name for accessing it later.
"""
softmax_propabilities = tensorflow.nn.softmax(fc_result2, name="softmax_probs")
"""
Predicitions labels of the CNN for each training sample.
The input sample is classified as the class of the highest probability.
axis=1 indicates that maximum of values in the second axis is to be returned. This returns that maximum class probability fo each sample.
"""
softmax_predictions = tensorflow.argmax(softmax_propabilities, axis=1)
#Cross entropy of the CNN based on its calculated probabilities.
cross_entropy = tensorflow.nn.softmax_cross_entropy_with_logits(logits=tensorflow.reduce_max(input_tensor=softmax_propabilities, reduction_indices=[1]),
labels=label_tensor)
#Summarizing the cross entropy into a single value (cost) to be minimized by the learning algorithm.
cost = tensorflow.reduce_mean(cross_entropy)
#Minimizng the network cost using the Gradient Descent optimizer with a learning rate is 0.01.
error = tensorflow.train.GradientDescentOptimizer(learning_rate=.01).minimize(cost)
#Creating a new TensorFlow Session to process the computational graph.
sess = tensorflow.Session()
#Wiriting summary of the graph to visualize it using TensorBoard.
tensorflow.summary.FileWriter(logdir="./log/", graph=sess.graph)
#Initializing the variables of the graph.
sess.run(tensorflow.global_variables_initializer())
"""
Because it may be impossible to feed the complete data to the CNN on normal machines, it is recommended to split the data into a number of patches.
A percent of traning samples is used to create each path. Samples for each path can be randomly selected.
"""
num_patches = 5#Number of patches
for patch_num in numpy.arange(num_patches):
print("Patch : ", str(patch_num))
percent = 80 #percent of samples to be included in each path.
#Getting the input-output data of the current path.
shuffled_data, shuffled_labels = get_patch(data=dataset_array, labels=dataset_labels, percent=percent)
#Data required for cnn operation. 1)Input Images, 2)Output Labels, and 3)Dropout probability
cnn_feed_dict = {data_tensor: shuffled_data,
label_tensor: shuffled_labels,
keep_prop: 0.5}
"""
Training the CNN based on the current patch.
CNN error is used as input in the run to minimize it.
SoftMax predictions are returned to compute the classification accuracy.
"""
softmax_predictions_, _ = sess.run([softmax_predictions, error], feed_dict=cnn_feed_dict)
#Calculating number of correctly classified samples.
correct = numpy.array(numpy.where(softmax_predictions_ == shuffled_labels))
correct = correct.size
print("Correct predictions/", str(percent * 50000/100), ' : ', correct)
Вместо того, чтобы передавать все обучающие данные в CNN, данные делятся на набор патчей, и патч за патчем подаются в сеть, используя цикл. Каждый патч содержит подмножество обучающих данных. Патчи возвращаются с помощью функции get_patch. Такая функция принимает входные данные, метки и процент выборок, которые должны быть возвращены из таких данных. Затем он возвращает подмножество данных в соответствии с введенным процентом.
def get_patch(data, labels, percent=70):
"""
Returning patch to train the CNN.
:param data: Complete input data after being encoded and reshaped.
:param labels: Labels of the entire dataset.
:param percent: Percent of samples to get returned in each patch.
:return: Subset of the data (patch) to train the CNN model.
"""
#Using the percent of samples per patch to return the actual number of samples to get returned.
num_elements = numpy.uint32(percent*data.shape[0]/100)
shuffled_labels = labels#Temporary variable to hold the data after being shuffled.
numpy.random.shuffle(shuffled_labels)#Randomly reordering the labels.
"""
The previously specified percent of the data is returned starting from the beginning until meeting the required number of samples.
The labels indices are also used to return their corresponding input images samples.
"""
return data[shuffled_labels[:num_elements], :, :, :], shuffled_labels[:num_elements]
5. Сохранение обученной модели CNN
После обучения CNN модель сохраняется для последующего повторного использования для тестирования в другом скрипте Python. Вы также должны изменить путь, в котором сохраняется модель, чтобы он соответствовал вашей системе.
#Saving the model after being trained.
saver = tensorflow.train.Saver()
save_model_path = "C:\\model\\"
save_path = saver.save(sess=sess, save_path=save_model_path+"model.ckpt")
print("Model saved in : ", save_path)
6. Подготовка тестовых данных и восстановление обученной модели CNN
Перед тестированием обученной модели необходимо подготовить тестовые данные и восстановить ранее обученную модель. Подготовка тестовых данных аналогична тому, что произошло с обучающими данными, за исключением того, что нужно декодировать только один двоичный файл. Тестовый файл декодируется согласно модифицированной функции get_dataset_images. Эта функция вызывает функцию unpickle_patch точно так же, как это делалось ранее с данными обучения.
def get_dataset_images(test_path_path, im_dim=32, num_channels=3):
"""
Similar to the one used in training except that there is just a single testing binary file for testing the CIFAR10 trained models.
"""
print("Working on testing patch")
data_dict = unpickle_patch(test_path_path)
images_data = data_dict[b"data"]
dataset_array = numpy.reshape(images_data, newshape=(len(images_data), im_dim, im_dim, num_channels))
return dataset_array, data_dict[b"labels"]
7. Тестирование обученной модели CNN.
После подготовки тестовых данных и восстановления обученной модели мы можем приступить к тестированию модели в соответствии со следующим кодом. Стоит упомянуть, что наша цель - просто вернуть сетевые прогнозы для входных выборок. Вот почему сеанс TF запускается, чтобы вернуть только прогнозы. При обучении CNN сеанс запускается для минимизации затрат. При тестировании мы больше не заинтересованы в минимизации затрат. Другой интересный момент заключается в том, что вероятность сохранения выпадающего слоя теперь установлена на 1. Это означает, что ни один узел не отбрасывается. Это потому, что мы просто используем предварительно обученную модель после определения того, какие узлы отбрасывать. Теперь мы просто используем то, что делала модель раньше, и не хотим вносить в нее изменения, отбрасывая другие узлы.
#Dataset path containing the testing binary file to be decoded.
patches_dir = "C:\\Users\\Dell\\Downloads\\Compressed\\cifar-10-python\\cifar-10-batches-py\\"
dataset_array, dataset_labels = get_dataset_images(test_path_path=patches_dir + "test_batch", im_dim=32, num_channels=3)
print("Size of data : ", dataset_array.shape)
sess = tensorflow.Session()
#Restoring the previously saved trained model.
saved_model_path = 'C:\\Users\\Dell\\Desktop\\model\\'
saver = tensorflow.train.import_meta_graph(saved_model_path+'model.ckpt.meta')
saver.restore(sess=sess, save_path=saved_model_path+'model.ckpt')
#Initalizing the varaibales.
sess.run(tensorflow.global_variables_initializer())
graph = tensorflow.get_default_graph()
"""
Restoring previous created tensors in the training phase based on their given tensor names in the training phase.
Some of such tensors will be assigned the testing input data and their outcomes (data_tensor, label_tensor, and keep_prop).
Others are helpful in assessing the model prediction accuracy (softmax_propabilities and softmax_predictions).
"""
softmax_propabilities = graph.get_tensor_by_name(name="softmax_probs:0")
softmax_predictions = tensorflow.argmax(softmax_propabilities, axis=1)
data_tensor = graph.get_tensor_by_name(name="data_tensor:0")
label_tensor = graph.get_tensor_by_name(name="label_tensor:0")
keep_prop = graph.get_tensor_by_name(name="keep_prop:0")
#keep_prop is equal to 1 because there is no more interest to remove neurons in the testing phase.
feed_dict_testing = {data_tensor: dataset_array,
label_tensor: dataset_labels,
keep_prop: 1.0}
#Running the session to predict the outcomes of the testing samples.
softmax_propabilities_, softmax_predictions_ = sess.run([softmax_propabilities, softmax_predictions],
feed_dict=feed_dict_testing)
#Assessing the model accuracy by counting number of correctly classified samples.
correct = numpy.array(numpy.where(softmax_predictions_ == dataset_labels))
correct = correct.size
print("Correct predictions/10,000 : ", correct)
8. Создание веб-приложения Flask
После обучения модели CNN мы можем добавить ее на HTTP-сервер и позволить пользователям использовать ее в Интернете. Пользователь загрузит изображение с помощью HTTP-клиента. Загруженное изображение будет получено HTTP-сервером или, точнее, веб-приложением Flask. Такое приложение предсказывает метку класса изображения на основе обученной модели и, наконец, возвращает метку класса обратно HTTP-клиенту. Такое обсуждение резюмируется на рисунке 5.

Чтобы начать сборку приложения Flask, создается библиотека flask и новое приложение с использованием класса Flask. Наконец, такое приложение будет запущено для доступа из Интернета. У такого приложения есть некоторые свойства, такие как хост, с которого будет осуществляться доступ, номер порта и флаг отладки для возврата отладочной информации. После запуска приложения к нему можно получить доступ, используя указанный хост и номер порта.
import flask
#Creating a new Flask Web application. It accepts the package name.
app = flask.Flask("CIFAR10_Flask_Web_App")
"""
To activate the Web server to receive requests, the application must run.
A good practice is to check whether the file is whether the file called from an external Python file or not.
If not, then it will run.
"""
if __name__ == "__main__":
"""
In this example, the app will run based on the following properties:
host: localhost
port: 7777
debug: flag set to True to return debugging information.
"""
app.run(host="localhost", port=7777, debug=True)
В настоящее время сервер не предоставляет никаких функций. Первое, что должен сделать сервер, - это разрешить пользователю загрузить изображение. Когда пользователь посещает корневой URL-адрес приложения, приложение ничего не делает. Приложение может перенаправить пользователя на HTML-страницу, на которую пользователь может загрузить изображение. Для этого в приложении есть функция redirect_upload, которая перенаправляет пользователя на страницу для загрузки изображения. Что позволяет этой функции выполняться после того, как пользователь посещает корень приложения, так это маршрутизация, созданная с использованием следующей строки:
app.add_url_rule(rule="/", endpoint="homepage", view_func=redirect_upload)
В этой строке сказано, что если пользователь заходит в корень приложения (помеченный как «/»), то будет вызвана функция просмотра (redirect_upload). Такая функция ничего не делает, кроме отображения HTML-страницы с именем upload_image.html. Такая страница находится в специальной директории templates на сервере. Страница внутри каталога шаблонов отображается путем вызова функции render_template. Обратите внимание, что есть атрибут, называемый конечной точкой, который позволяет легко повторно использовать один и тот же маршрут несколько раз без жесткого его кодирования.
def redirect_upload():
"""
A viewer function that redirects the Web application from the root to a HTML page for uploading an image to get classified.
The HTML page is located under the /templates directory of the application.
:return: HTML page used for uploading an image. It is 'upload_image.html' in this exmaple.
"""
return flask.render_template(template_name_or_list="upload_image.html")
"""
Creating a route between the homepage URL (http://localhost:7777) to a viewer function that is called after getting to such URL.
Endpoint 'homepage' is used to make the route reusable without hard-coding it later.
"""
app.add_url_rule(rule="/", endpoint="homepage", view_func=redirect_upload)
Экран отображаемой HTML-страницы показан на рисунке 6.
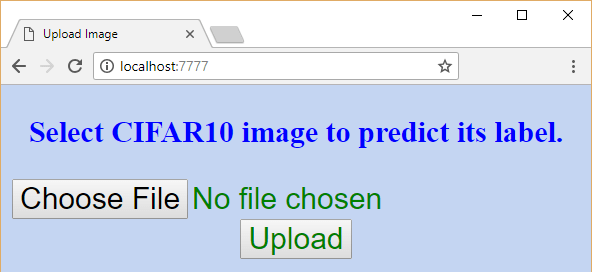
Вот HTML-код такой страницы. Это простая форма, которая позволяет пользователю загрузить файл изображения. При отправке такой формы сообщение POST HTTP должно быть возвращено на URL-адрес http: // localhost: 7777 / upload /.
<!DOCTYPE html>
<html lang="en">
<head>
<link rel="stylesheet" type="text/css" href="{{url_for(endpoint='static', filename='project_styles.css')}}">
<meta charset="UTF-8">
<title>Upload Image</title>
</head>
<body>
<form enctype="multipart/form-data" method="post" action="http://localhost:7777/upload/">
<center>
<h3>Select CIFAR10 image to predict its label.</h3>
<input type="file" name="image_file" accept="image/*"><br>
<input type="submit" value="Upload">
</center>
</form>
</body>
</html>
После возврата на сервер из HTML-формы будет вызвана функция просмотра, связанная с URL-адресом, указанным в атрибуте действие формы, которая является функцией upload_image. Такая функция получает изображение, выбранное пользователем, и сохраняет его на сервере.
def upload_image():
"""
Viewer function that is called in response to getting to the 'http://localhost:7777/upload' URL.
It uploads the selected image to the server.
:return: redirects the application to a new page for predicting the class of the image.
"""
#Global variable to hold the name of the image file for reuse later in prediction by the 'CNN_predict' viewer functions.
global secure_filename
if flask.request.method == "POST":#Checking of the HTTP method initiating the request is POST.
img_file = flask.request.files["image_file"]#Getting the file name to get uploaded.
secure_filename = werkzeug.secure_filename(img_file.filename)#Getting a secure file name. It is a good practice to use it.
img_path = os.path.join(app.root_path, secure_filename)#Preparing the full path under which the image will get saved.
img_file.save(img_path)#Saving the image in the specified path.
print("Image uploaded successfully.")
"""
After uploading the image file successfully, next is to predict the class label of it.
The application will fetch the URL that is tied to the HTML page responsible for prediction and redirects the browser to it.
The URL is fetched using the endpoint 'predict'.
"""
return flask.redirect(flask.url_for(endpoint="predict"))
return "Image upload failed."
"""
Creating a route between the URL (http://localhost:7777/upload) to a viewer function that is called after navigating to such URL.
Endpoint 'upload' is used to make the route reusable without hard-coding it later.
The set of HTTP method the viewer function is to respond to is added using the 'methods' argument.
In this case, the function will just respond to requests of method of type POST.
"""
app.add_url_rule(rule="/upload/", endpoint="upload", view_func=upload_image, methods=["POST"])
После успешной загрузки изображения на сервер мы готовы прочитать изображение и предсказать его метку класса, используя предварительно обученную модель CNN. По этой причине функция upload_image перенаправляет приложение к функции просмотра, которая отвечает за прогнозирование метки класса изображения. Такая функция просмотра достигается его конечной точкой, как указано в этой строке:
return flask.redirect(flask.url_for(endpoint="predict"))
Будет вызван метод, связанный с endpoint = ”predict”, который является функцией CNN_predict.
def CNN_predict():
"""
Reads the uploaded image file and predicts its label using the saved pre-trained CNN model.
:return: Either an error if the image is not for CIFAR10 dataset or redirects the browser to a new page to show the prediction result if no error occurred.
"""
"""
Setting the previously created 'secure_filename' to global.
This is because to be able invoke a global variable created in another function, it must be defined global in the caller function.
"""
global secure_filename
#Reading the image file from the path it was saved in previously.
img = scipy.misc.imread(os.path.join(app.root_path, secure_filename))
"""
Checking whether the image dimensions match the CIFAR10 specifications.
CIFAR10 images are RGB (i.e. they have 3 dimensions). It number of dimenions was not equal to 3, then a message will be returned.
"""
if(img.ndim) == 3:
"""
Checking if the number of rows and columns of the read image matched CIFAR10 (32 rows and 32 columns).
"""
if img.shape[0] == img.shape[1] and img.shape[0] == 32:
"""
Checking whether the last dimension of the image has just 3 channels (Red, Green, and Blue).
"""
if img.shape[-1] == 3:
"""
Passing all conditions above, the image is proved to be of CIFAR10.
This is why it is passed to the predictor.
"""
predicted_class = CIFAR10_CNN_Predict_Image.main(img)
"""
After predicting the class label of the input image, the prediction label is rendered on an HTML page.
The HTML page is fetched from the /templates directory. The HTML page accepts an input which is the predicted class.
"""
return flask.render_template(template_name_or_list="prediction_result.html", predicted_class=predicted_class)
else:
# If the image dimensions do not match the CIFAR10 specifications, then an HTML page is rendered to show the problem.
return flask.render_template(template_name_or_list="error.html", img_shape=img.shape)
else:
# If the image dimensions do not match the CIFAR10 specifications, then an HTML page is rendered to show the problem.
return flask.render_template(template_name_or_list="error.html", img_shape=img.shape)
return "An error occurred."#Returned if there is a different error other than wrong image dimensions.
"""
Creating a route between the URL (http://localhost:7777/predict) to a viewer function that is called after navigating to such URL.
Endpoint 'predict' is used to make the route reusable without hard-coding it later.
"""
app.add_url_rule(rule="/predict/", endpoint="predict", view_func=CNN_predict)
Такой метод считывает изображение и проверяет, соответствует ли оно размерам набора данных CIFAR-10, который составляет 32x32x3. Если изображение соответствует спецификациям набора данных CIFAR-10, оно будет передано функции, отвечающей за прогнозирование, как показано в следующей строке:
predicted_class = CIFAR10_CNN_Predict_Image.main(img)
Основная функция, отвечающая за прогнозирование метки класса изображения, определяется, как показано ниже. Он восстанавливает обученную модель и запускает сеанс, который возвращает предсказанный класс изображения. Предсказанный класс возвращается обратно в веб-приложение Flask.
def main(img):
"""
The 'main' method accepts an input image array of size 32x32x3 and returns its class label.
:param img:RGB image of size 32x32x3.
:return:Predicted class label.
"""
#Dataset path containing a binary file with the labels of classes. Useful to decode the prediction code into a significant textual label.
patches_dir = "C:\\cifar-10-python\\cifar-10-batches-py\\"
dataset_array = numpy.random.rand(1, 32, 32, 3)
dataset_array[0, :, :, :] = img
sess = tensorflow.Session()
#Restoring the previously saved trained model.
saved_model_path = 'C:\\model\\'
saver = tensorflow.train.import_meta_graph(saved_model_path+'model.ckpt.meta')
saver.restore(sess=sess, save_path=saved_model_path+'model.ckpt')
#Initalizing the varaibales.
sess.run(tensorflow.global_variables_initializer())
graph = tensorflow.get_default_graph()
"""
Restoring previous created tensors in the training phase based on their given tensor names in the training phase.
Some of such tensors will be assigned the testing input data and their outcomes (data_tensor, label_tensor, and keep_prop).
Others are helpful in assessing the model prediction accuracy (softmax_propabilities and softmax_predictions).
"""
softmax_propabilities = graph.get_tensor_by_name(name="softmax_probs:0")
softmax_predictions = tensorflow.argmax(softmax_propabilities, axis=1)
data_tensor = graph.get_tensor_by_name(name="data_tensor:0")
label_tensor = graph.get_tensor_by_name(name="label_tensor:0")
keep_prop = graph.get_tensor_by_name(name="keep_prop:0")
#keep_prop is equal to 1 because there is no more interest to remove neurons in the testing phase.
feed_dict_testing = {data_tensor: dataset_array,
keep_prop: 1.0}
#Running the session to predict the outcomes of the testing samples.
softmax_propabilities_, softmax_predictions_ = sess.run([softmax_propabilities, softmax_predictions],
feed_dict=feed_dict_testing)
label_names_dict = unpickle_patch(patches_dir + "batches.meta")
dataset_label_names = label_names_dict[b"label_names"]
return dataset_label_names[softmax_predictions_[0]].decode('utf-8')
Возвращенная метка класса изображения будет отображаться на новой HTML-странице с именем prediction_result.html в соответствии с инструкциями функции CNN_predict в этой строке, как показано на рисунке 7.

Обратите внимание, что приложение Flask использует механизм шаблонов Jinja2, который позволяет странице HTML принимать входные аргументы. Входной аргумент, переданный в этом случае, - это predicted_class = predicted_class.
return flask.render_template(template_name_or_list="prediction_result.html", predicted_class=predicted_class)
HTML-код такой страницы выглядит следующим образом.
<!DOCTYPE html>
<html lang="en">
<head>
<link rel="stylesheet" type="text/css" href="{{url_for(endpoint='static', filename='project_styles.css')}}">
<script type="text/javascript" src="{{url_for(endpoint='static', filename='result.js')}}"></script>
<meta charset="UTF-8">
<title>Prediction Result</title>
</head>
<body onload="show_alert('{{predicted_class}}')">
<center><h1>Predicted Class Label : <span>{{predicted_class}}</span></h1>
<br>
<a href="{{url_for(endpoint='homepage')}}"><span>Return to homepage</span>.</a>
</center>
</body>
</html>
Это шаблон, который заполняется предсказанным классом изображения, который передается в качестве аргумента на HTML-страницу, как в этой части кода:
<span>{{predicted_class}}</span>
Для получения дополнительной информации о Flask RESTful API вы можете посетить такой учебник https://www.tutorialspoint.com/flask/index.htm.
Полный проект доступен на Github по этой ссылке: https://github.com/ahmedfgad/CIFAR10CNNFlask
Первоначально опубликовано на https://www.linkedin.com 1 мая 2018 г.
Оригинальная статья доступна в LinkedIn по этой ссылке:
Https://www.linkedin.com/pulse/complete-guide-build-convnet-http-based-application-using-ahmed-gad
Для связи с автором
Ахмед Фаузи Гад
LinkedIn: https://linkedin.com/in/ahmedfgad
Электронная почта: [email protected]